The first obstacle was the VirtualBox GUI. There you can't create a virtual HD that is larger than 2TB.
With less than 2TB HD
When you don't need more than 2TB than simple download 64 Bit FreeBSD DVD, create a virtual machine in VirtualBox and go on. FreeBSD 10 has an installation option to make ZFS the root filesystem.
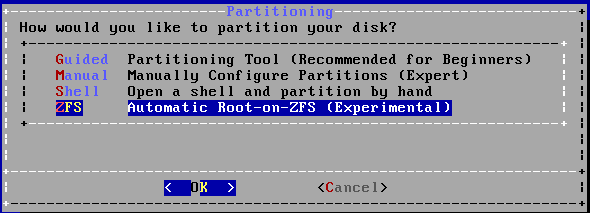
Select this and you are able to select encryption on the next screen.

Go through the remaining steps and you are done.
With more than 2TB HD
I've done some research about the 2TB limit before I've started the recreation and found out there is a command line tool to create larger HDs:
VBoxManage createhd --filename freebsd_file_server.vdi --size 3200000 --format VDI --variant Standard
So create first the virtual HD and then the virtual machine. Well, it turned out that it isn't that easy. This HD didn't work with FreeBSD in VirtualBox. You can start the installer but as soon as you boot from a HD and not a CD/DVD it will cause the virtual machine to fail with "Fatal: int13_harddisk_ext: function 42. Can't use 64bits lba". I've thought that there were some wrong settings on the real PC. That's why I've tried to create a machine with a 20GB HD. It worked as easy and smooth as my description above sounds. Then I've just added the large HD to this new virtual machine and I've got the error again. So to sum things up: One big HD won't work. The 2TB limit in the VirtualBox GUI has some meaning here.
So if one HD isn't an option maybe two are. As ZFS uses pools over real devices this is an option. You will see one big pool that is backed by two HDs. Note, that you will see a lot of warning about this configuration but as long as the two virtual HDs are on the SAME ONE real HD everything is OK.
The challenging part is the encryption. FreeBSD doesn't have a ZFS with native encryption. For encryption you have to rely on the FreeBSD tools like geli. Geli knows nothing about pools but just about slices. Two HDs means at least two slices which would mean entering the password two times. Sounds pretty bad. Fortunately geli has an option to use also key files for encryption and the password is optional then. Of course the keys need to be at a save place because everyone that has access to the keys can decrypt the HDs.
So the setting was that I've got a 20GB boot HD (with boot HD I don't mean just the bootfs but a complete virtual PC), a 2TB data storage and a 1.2TB data storage. The 20GB is protected by a password and has the keys on it. The two large HDs are encrypted with the keys.
To set up the two HDs I've used this commands:
gpart create -s GPT ada1
gpart create -s GPT ada2
gpart add -t freebsd-zfs -l zfs-storage-1 ada1
gpart add -t freebsd-zfs -l zfs-storage-2 ada2
mkdir /etc/zfs-storage
dd if=/dev/random of=/etc/zfs-storage/vol1.key bs=256 count=1
dd if=/dev/random of=/etc/zfs-storage/vol2.key bs=256 count=1
geli init -s 4096 -B /tmp/zfs-storage-1.bak -P -K /etc/zfs-storage/vol1.key -l 256 gpt/zfs-storage-1
geli init -s 4096 -B /tmp/zfs-storage-2.bak -P -K /etc/zfs-storage/vol2.key -l 256 gpt/zfs-storage-2
geli attach -p -k /etc/zfs-storage/vol1.key gpt/zfs-storage-1
geli attach -p -k /etc/zfs-storage/vol2.key gpt/zfs-storage-2
zpool create -o cachefile=/boot/zfs/zpool.cache -m /data data-pool gpt/zfs-storage-1.eli gpt/zfs-storage-2.eli
The result is a 3.2 TB large pool named data-pool on two encrypted devices (gpt/zfs-storage-1.eli and gpt/zfs-storage-2.eli). At this point the data-pool isn't mounted automatically on boot. As the encrypted zfs root is mounted (including the wait for password entering) I've searched how it is done. There is an entry in /boot/loader.conf. I've tried to mimic that entry but that was in vain. I've done some search and as far as I can tell this isn't possible. But someone suggested a boot script will do the job.
I've saved the following script in /etc/rc.d/gelikeys:
#!/bin/sh
# PROVIDE: gelikeys
# BEFORE: NETWORKING
. /etc/rc.subr
name="gelikeys"
rcvar=${name}_enable
start_cmd="${name}_start"
stop_cmd=":"
gelikeys_start()
{
echo "Unlocking encrypted drives."
geli attach -p -k /etc/zfs-storage/vol1.key gpt/zfs-storage-1
geli attach -p -k /etc/zfs-storage/vol2.key gpt/zfs-storage-2
zfs mount -a
}
load_rc_config $name
run_rc_command "$1"
Having the script isn't enough. It has to be enabled:
echo 'gelikeys_enable="YES"' >> rc.conf
Setting up the system
As written in the original article you want to split the large pool into filesystem as snapshots can go back not on file basis but only on filesystem basis. Anything larger than 200GB can't be dealt with. (*Please read on before doing this) Here is a sample:
zfs create data-pool/mail
zfs set mountpoint=/mail data-pool/mail
After the filesystems are created it is a good time to save some keys and restoring metadata. The metadata for the zfs-storage-* slices where stored in /tmp directory as given in the commands. For the root device it as to be done explicitly.
geli backup /dev/ada0p4 /tmp/root.bak
This assumes that the root device is the slice ada0p4. Just check that this is true. Now save the metadata and the decryption key in a password saved tar file (no need to zip it):
mv /tmp/*bak /root/
tar -cf - /root/*bak /etc/zfs-storage/vol* /boot/encryption.key > save.tar
cat save.tar | openssl enc -aes-256-cbc -e > save.tar.enc
Don't forget to put save.tar.enc outside the virtual machine and on another machine than the HD where you backup system is. To get the data back:
cat save.tar.enc | openssl enc -aes-256-cbc -d > save.tar
In the default installation the swap isn't encrypted. To encrypt the swap just change the /etc/fstab entry to this (assuming ada0p3 is you swap device):
/dev/ada0p3.eli none swap sw 0 0
geli will the automatically encrypt the swap space. No keys/passwords needed. When unsure what you swap device is use this command:
glabel list
The syntax for installing additional software has changed. Use now:
pkg install rsync
pkg install dovecot
For setting up rsync and dovecot see the old blog post/article. Nothing changed for the configuration.
Transferring the data
The new system is set up but all the valuable data are in the old one. Time to get them over. Well, there are some gotchas and I'm going to describe them.
zfs allows to send snapshots of filesystems via ssh from one machine to another. Gotcha one: The filesystem shouldn't exist in the target machine. So don't create any filesystem that is in the old one and that you want to transfer to the new system. Gotcha two: Works only fine for filesystems up to 100GB or when you can allow to run both machines for some days.
The next solution would be rsync. It won't be faster but you can shutdown the machines between the transferring.
In order to transfer the data as root and not configuring /usr/local/etc/rsyncd.conf edit /etc/ssh/sshd_config to have this value:
PermitRootLogin yes
The next gotcha was that my old virtual machine froze when I was using a real network between the two virtual machines.
So I've copied the old virtual machine on an external HD and started it on the new computer. I've also increased the RAM of both virtual machine (old and new backup system) to 4GB.
Then I've done the rsync again. It took several nights (I didn't run it during the day) but finally I was done with 1.1TB.
Between the remote and the local sync I've tried to include the old HD in the new backup system. It seems that the internal structure changed. I've got core dumps and the machine froze after the first reboot. It definitively doesn't work.
Update:
Please see also FreeBSDBackup Update 2017